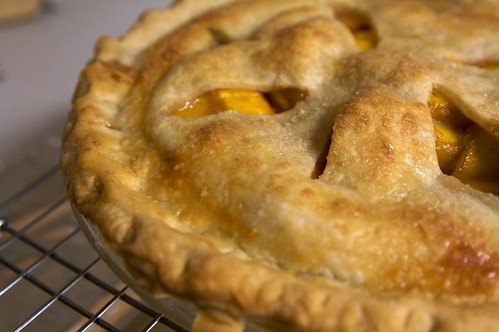
Romance peach pie and my new favorite pie crust

I have been on a hunt for a perfect pie crust for years. My old stand-by, the Cooks Illustrated recipe, makes a delicious-tasting crust, but the dough is so delicate that I always end up swearing a lot when I make it. Miles is getting old enough now that he shouldn’t hear sh*t like that. What’s more, the CI recipe results in an extremely tender crust that can’t really hold up to juicy fruit fillings. Getting a slice out of the pie pan usually results in a glob of fruit on the plate with pie crust sprinkled over it.
It’s tasty, yes, but not perfect. It’s also kind of a pain, because it involves shortening and butter separately diced and chilled, then it’s done in the food processor, which seems easy at the time but loses its appeal when it comes time to clean all those parts. And forget making a double batch.
Next I tried a supposedly fool-proof all-butter crust from Smitten Kitchen. That author eschews the food processor and recommends a pastry blender. To be fair, I was using a butter I hadn’t used very much (Lurpak), which I thought was going to be great because it was expensive and European. But something went wrong, and although the dough was one hundred times easier to work with than the CI recipe, it resulted in a tough, really unpleasant crust. To this day I’m embarrassed that I served it to my Grammy.
I didn’t make any pies for a while.
Then I found this recipe from the awesome Chez Pim. She claims it’s perfect, suitable for sweet or savory fillings, one- or two-crust pies, tarts, even Pop-Tarts.
Her technique was one I’d never tried before. Not only does she not recommend a food processor, she doesn’t even employ a pastry blender. Wha? I never realized there was alternative (except maybe two knives, but does anyone really do that?). What she suggests is a method in which you plop unfussily-cut butter directly onto a pile of flour, then mash it with your palm. You keep tossing flour into the mashed-butter, smashing and mooshing all the way, until it’s incorporated. Then you throw some water on there and chill it. That’s first step.
Next, you use a puff-pastry technique of multiple flips and folds that’s a lot easier than it sounds. Pim’s site has a complete step-by-step with photos, and you’ll find it’s really quite simple. It’s counter to all I’d read about pie crust prep, but having done it once now, I’m a true believer.
My crust came out crisp yet delicate, extremely flaky, and with the great flavor that can only come from good old salted butter.
I’m blogging a simplified version here, though I recommend you reference Pim’s original for your first time. She admits to cribbing the idea from the Zuni Cafe, and they make a helluva chicken, so why not?
Fantastic Pie Crust that Makes Me Hopeful for Humanity
250 grams (~2.25 cups) AP flour
8 oz (2 sticks) salted butter
60 ml (.25 cup) cold water
Cut butter into slabs and work it into the flour with the heel of your left hand (or your right hand if you’re left-handed). Use your other hand to scoop the loose flour into the mix with a pastry scraper.
When it’s a nice mix of big flakes of flour-coated butter and some smaller crumbs, make a well and pour in the water. Quickly gather it all together with your fingers until it makes a cohesive ball.
Chill the ball for 30 minutes.
On a well-floured pastry board, roll the chilled dough ball into a rectangle, then fold it over into thirds (like folding a letter to put in an envelope). Before you overlap any dough, brush off excess flour with a pastry brush (this is important, according to Pim. I’m not going to doubt her on this.). Rotate 90 degrees and repeat the rolling/brushing/folding. Repeat, making a total of 3 or so operations. The dough will become more elastic as you work. This is what will save you from scarring your kid’s brain with profanities.
Divide into 2 balls, then chill for at least 30 minutes.
Roll one ball into a ~11-12 inch round, then transfer to a 9-inch pie plate. I did it on the first try, no horror at all! Fill it with your favorite filling, then put egg wash around the outer edge. Roll out the second ball and put it on top. Pinch the edges decoratively. Do an egg wash on top, and if it’s a sweet pie, sprinkle coarse sugar on top.
Romance Peach Pie filling
6-7 peaches, peeled and sliced
1 cup sugar
1 tablespoon lemon juice (I used white wine vinegar + Meyer lemon extract because I didn’t have a lemon around)
4 tablespoons cornstarch
1 pinch salt
1 pinch cinnamon
dash cloves
dash nutmeg
Combine the above. Be sure you’re using a glass pie pan. Pour the filling into the lower crust and place the upper crust. Cut vents in the upper crust. Preheat oven to 500F with a rimmed metal baking pan in it. When oven is ready, place pie pan directly on metal baking pan and lower heat to 425F. Bake for 25-30 minutes. Reduce heat to 375F and bake for another 25-30 minutes, until the top is golden brown and the juices bubble. You may need to put a pie guard or aluminum foil around the edge to prevent over-browning.
—
Why is it Romance Peach Pie, you ask? Well…Denny and I shared a peach on our first date, and we had peaches on our wedding cake, and peaches are always coming into season right around our anniversary. So there you go.

